
Testing a dirt bike stator is essential for ensuring your bike runs smoothly. A faulty stator can cause electrical problems.
So, how do you test it? Your dirt bike’s stator is crucial for generating the electricity needed to power your bike. Without it, your bike might not start or run properly. Testing the stator helps you identify any issues early on, saving you time and money.
In this guide, we’ll walk you through the process step by step. Whether you’re a beginner or have some experience, this information will be useful. Let’s dive in and keep your dirt bike in top shape.

Credit: www.revzilla.com
Tools Needed
Testing a dirt bike stator requires specific tools to ensure accurate results. These tools help diagnose problems and keep the bike running smoothly. Below, we break down the essential and optional tools needed for this task.
Essential Tools
A multimeter is crucial. It measures voltage, resistance, and current. Make sure it has a continuity test function. This helps check for open circuits.
You will also need a set of screwdrivers. Both flathead and Phillips are necessary. They help remove stator covers and other components.
An impact driver is useful. It helps loosen tight bolts. Some bolts may be hard to remove with a regular screwdriver.
A flywheel puller is important. It removes the flywheel without damaging it. This tool is specific to your dirt bike model.
A service manual for your dirt bike is essential. It provides specific instructions and specifications. Follow it closely for accurate testing.
Optional Tools
An ohmmeter can be handy. It measures the resistance more accurately than a multimeter. This can be useful for precise readings.
A stator testing kit might be available. These kits include various tools designed for stator testing. They can simplify the process.
A magnifying glass helps inspect small components. Look for signs of wear or damage. This can be useful during a thorough inspection.
Safety gear is always recommended. Gloves and safety glasses protect you. Handling tools and bike parts can pose risks.
A workbench with good lighting is beneficial. It provides a stable workspace. Good lighting ensures you see what you’re doing.

Credit: www.youtube.com
Safety Precautions
Testing a dirt bike stator requires careful attention to safety precautions. Ensuring your safety is the top priority. Follow these guidelines to protect yourself.
Protective Gear
Always wear protective gear when testing a dirt bike stator. Gloves protect your hands from sharp edges and electrical shocks. Safety glasses shield your eyes from potential sparks. Wear a long-sleeve shirt and pants to cover your skin. Proper footwear, like boots, guards your feet from injuries.
Safe Work Environment
Set up a safe work environment before starting the test. Choose a well-lit area to see clearly. Ensure the space is clean and free of clutter. Keep tools organized to avoid accidents. Make sure the bike is on a stable surface to prevent it from tipping. Disconnect the battery to avoid accidental shocks. Have a fire extinguisher nearby in case of emergencies.
Pre-test Inspection
Before you test your dirt bike stator, a pre-test inspection is essential. This step helps identify obvious issues that might affect your test results. It’s a quick and easy process that can save time and effort.
Visual Inspection
Start with a visual inspection. Look for visible damage on the stator. Check for burnt or melted wires. Examine the stator for any signs of wear or corrosion. A damaged stator might need replacing instead of testing.
Check Connections
Next, check all connections. Loose or corroded connections can cause problems. Ensure all connectors are tightly secured. Clean any dirty or corroded connections with a wire brush. A good connection ensures accurate test results.
Testing With A Multimeter
Testing your dirt bike’s stator can seem complicated. But with a multimeter, it’s straightforward. A multimeter helps you check the electrical health of your stator. In this guide, we will walk you through the process. We will cover setting up the multimeter and measuring resistance.
Setting Up The Multimeter
First, ensure your multimeter is in good working condition. Turn the dial to the resistance (ohm) setting. This is usually marked with the Greek letter omega (Ω). Make sure the multimeter probes are connected correctly. The black probe goes into the COM port. The red probe goes into the port marked with Ω.
Next, power off your dirt bike. Locate the stator connector. Disconnect it from the wiring harness. Now, you are ready to test the stator.
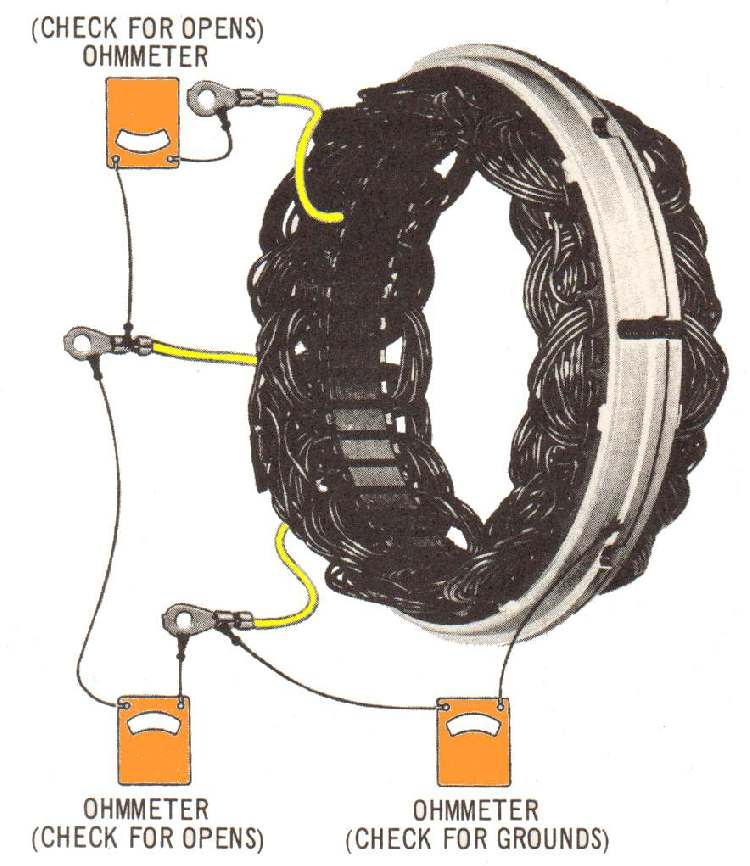
Measuring Resistance
Insert the probes into the stator connector terminals. Place the black probe on one terminal. Place the red probe on another terminal. Note the reading on the multimeter display. It should match the resistance range specified in your dirt bike’s manual. Repeat this process for all terminal pairs.
If the readings are outside the specified range, the stator may be faulty. Consistent readings within the range indicate a healthy stator. This simple test can help diagnose electrical issues in your dirt bike.
Testing For Ac Voltage
Testing the AC voltage of your dirt bike’s stator is crucial. It ensures the bike’s electrical system works correctly. The stator generates power for the engine and other components. Follow these steps to test the AC voltage. This guide will help you get accurate readings.
Locating Stator Wires
First, find the stator wires on your dirt bike. They usually connect to the voltage regulator. Look for a bundle of wires coming from the engine case. The stator wires often have a unique connector. Check your bike’s manual if unsure. Identifying these wires is the first step to testing the stator.
Interpreting Voltage Readings
Set your multimeter to AC voltage. Connect the probes to the stator wires. Start the engine and let it idle. The multimeter should show a steady AC voltage. A typical reading ranges between 20 to 50 volts. If the voltage is too low, the stator may be faulty. Too high a voltage can also signal problems. Compare your readings with the bike’s manual. Accurate readings ensure your bike runs smoothly.
Credit: www.dansmc.com
Advanced Testing Methods
Testing a dirt bike stator can be challenging. Basic tests might not reveal hidden issues. Advanced testing methods provide deeper insights. These methods ensure your dirt bike runs smoothly. Let’s explore some advanced techniques to test your stator.
Load Testing
Load testing assesses the stator under real-world conditions. First, connect a load tester to the stator. This simulates the electrical load of the bike. Observe the voltage output. A healthy stator should maintain a steady voltage. If the voltage drops, the stator might be faulty. This test reveals issues not found in basic tests.
Oscilloscope Testing
An oscilloscope provides a visual representation of the stator’s output. Connect the oscilloscope to the stator. Observe the waveform on the screen. A smooth, consistent waveform indicates a healthy stator. Irregularities in the waveform suggest potential problems. This method offers precise diagnostics. An oscilloscope can detect issues missed by other tests.
Interpreting Results
Testing your dirt bike stator can seem intimidating. Knowing how to interpret the results is crucial. Understanding what the readings mean helps you identify any issues. This section guides you through normal readings and how to spot faults.
Normal Readings
A functioning stator shows specific readings. These readings are consistent. Using a multimeter, check the resistance. A typical reading is between 0.1 and 1.0 ohms. This range indicates the stator coils are in good condition. The voltage output should also be stable. It usually reads between 20 and 50 volts AC. This reading occurs when the engine is running. Such readings imply your stator is working correctly.
Identifying Faults
Abnormal readings can indicate issues. If resistance is too high or too low, it suggests a problem. Open circuits or short circuits are possible causes. A reading of zero ohms signals a short circuit. This means the coils are touching, which they shouldn’t be. Infinite resistance means an open circuit. This suggests a break in the wire.
Check the voltage output as well. Low voltage readings might indicate a failing stator. No voltage could mean the stator is dead. Always compare your readings to the manufacturer’s specifications. Different bikes may have different acceptable ranges. Consistent abnormal readings usually point to a faulty stator. Replacing it might be necessary to restore functionality.
Maintenance Tips
Keeping your dirt bike stator in top condition requires regular maintenance. This ensures the bike runs smoothly and prevents unexpected breakdowns. Here are some essential maintenance tips.
Regular Cleaning
Regular cleaning of your dirt bike stator is crucial. Dirt and grime can build up and cause issues. Here’s a simple cleaning routine:
- Remove the stator cover.
- Use a soft brush to clean off any dirt.
- Wipe the stator with a clean, dry cloth.
Ensure you clean the stator after every ride. This prevents dirt from causing damage.
Proper Storage
Storing your dirt bike properly extends the life of the stator. Follow these tips:
- Store the bike in a dry place.
- Use a bike cover to protect it from dust.
- Ensure the storage area is free from moisture.
Proper storage keeps the stator components safe from corrosion and other damage.
Incorporate these maintenance tips into your routine. They help ensure your dirt bike stator remains in excellent condition.
Frequently Asked Questions
What Is A Stator On A Dirt Bike?
A stator is a crucial component of a dirt bike’s electrical system. It generates the electricity needed to power the bike’s ignition and other electrical components.
How Do I Know If My Stator Is Bad?
Symptoms of a bad stator include difficulty starting, misfiring, and a weak or dead battery. Testing the stator can confirm if it’s faulty.
Can I Test A Stator Without Removing It?
Yes, you can test a stator without removing it. Use a multimeter to measure resistance and output voltage while the stator is still in the bike.
What Tools Do I Need To Test A Stator?
To test a stator, you’ll need a multimeter. This tool measures electrical resistance, voltage, and continuity. Make sure your multimeter is set to the appropriate settings.
Conclusion
Testing your dirt bike stator is crucial for smooth rides. Follow the steps outlined for accurate results. Regular checks prevent unexpected breakdowns. A well-maintained stator ensures your bike runs efficiently. Enjoy safer and more enjoyable rides. Keep your dirt bike in top condition.
Happy riding!


Leave a Reply